AEM Forma + Data Model
This blog will help us to get over all idea around RESTful API (AEM servlet), Swagger File, Data source configuration, data form model and integration with AEM Forms.
AEM forms work like a charm as there is no single line code change required to create and integrate same with RESTful web API’s.
AS part of this blog AEM forms will submit data to AEM and load or prefill data in form on page load.
This blog will work for both AEM as an AMS and AEMaaCS. It will allow us to create AEM forms and integrate with Form Data Model.
We are going to achieve below flow as part of this blog.
- Create RESTful API (AEM Servlet having sample GET and POST method).
- Swagger file to read document, build and consume RESTful API’s created as part of first step.
- Data Source Configuration helps us to consume RESTful web API’s with the help of swagger file.
- Create Data Form Model using Data Source Configuration helps us to use it as schema in various adaptive forms and interactive communications workflows.
- Create AEM Forms and integrate it form data model.

Follow URL to setup AEM Form on AEM as AMS
Follow URL to setup AEM Form on AEM as a cloud service.
Create RESTful API
RESTful API helps two different system to communicate over the internet using http or https protocol. We will be creating an AEM servlet as part of this blog to create RESTful API. Create below having GET and POST methods as part of existing or new project.
GET Method: It will return hardcoded user details define.
POST Servlet: It will return the same data passed as part of request body.
import org.apache.sling.api.SlingHttpServletRequest;
import org.apache.sling.api.SlingHttpServletResponse;
import org.apache.sling.api.servlets.SlingAllMethodsServlet;
import org.osgi.framework.Constants;
import org.osgi.service.component.annotations.Component;
import org.slf4j.Logger;
import org.slf4j.LoggerFactory;

import javax.servlet.Servlet;
import java.io.BufferedReader;
import java.io.IOException;

@Component(
 service=Servlet.class,
 property={
  Constants.SERVICE_DESCRIPTION + "=Custom Servlet",
  "sling.servlet.methods={GET,POST}",
  "sling.servlet.paths=" + "/bin/user",
  "sling.servlet.extensions=" + "json"
 }
)
public class UserServlet extends SlingAllMethodsServlet {

 private static final long serialVersionUID = 1L;

 private final Logger logger = LoggerFactory.getLogger(getClass());

 @Override
 protected void doGet(final SlingHttpServletRequest req,
  final SlingHttpServletResponse resp) throws IOException {

  resp.setContentType("application/json;charset=UTF-8");
  resp.setStatus(SlingHttpServletResponse.SC_OK);
  resp.getWriter().print("{\"firstName\" : \"John\",\"lastName\" : \"Carter\"}");
 }

 @Override
 protected void doPost(final SlingHttpServletRequest req,
        final SlingHttpServletResponse resp) throws IOException {
  logger.debug("Entering UserServlet >>>>>>>");

  StringBuffer jb = new StringBuffer();
  String line = null;
  try {
   BufferedReader reader = req.getReader();
   while ((line = reader.readLine()) != null)
    jb.append(line);
  } catch (Exception e) {

  }

  resp.setContentType("application/json;charset=UTF-8");
  resp.setStatus(SlingHttpServletResponse.SC_OK);
  resp.getWriter().print(jb);

  logger.error("Entering UserServlet >>>>>>>");
 }
}
Create Swagger File
Refer to below swagger file to get the details for RESTful APIs. Swagger file help us to document and consume RESTful web API services.
Below is the sample swagger file:
{
  "swagger": "2.0",
  "info": {
    "description": "Practice User API",
    "version": "1.0",
    "title": "Practice User API"
  },
  "host": "localhost:4502",
  "schemes": [
    "http"
  ],
  "paths": {
 "/bin/user.json": {
  "post": {
   "summary": "Post user detail",
   "description": "Post user detail",
   "operationId": "postUser",
   "consumes": ["application/json"],
   "produces": ["application/json"],
   "parameters": [{
    "in": "body",
    "name": "userId",
    "description": "user Id",
    "required": true,
    "schema": {
     "$ref": "#/definitions/User"
    }
   }],
   "responses": {
    "200": {
     "description": "OK",
     "schema": {
      "$ref": "#/definitions/User"
     }
    }
   }
  },
  "get": {
        "summary": "Get all users",
        "description": "Returns list of users",
        "operationId": "getLeadsByFilterUsingGET",
        "consumes": [
          "application/json"
        ],
        "produces": [
          "application/json"
        ],
        "responses": {
          "200": {
            "description": "OK",
            "schema": {
              "$ref": "#/definitions/User"
            }
          }
        }
      }
 }
  },
  "definitions": {
    "User": {
      "type": "object",
      "properties": {
        "firstName": {
          "type": "string"
        },
        "lastName": {
          "type": "string"
        }
      }
    }
  }
}
Create Data Source Configuration
Data Source allow us to connect with AEM Forms. Below are the OOTB data sources are available. However, with little customization, you can integrate other data sources as well.
- Relational databases — MySQL, Microsoft SQL Server, IBM DB2, Oracle RDBMS, and Sybase
- AEM user profile
- RESTful web services
- SOAP-based web services
- OData services
Follow below steps to create a data source configuration:
- Hit URL and traverse to below mentioned sequence and select Data Source:

2. Select project under which we want to create data source configuration and click on create button as shown below:

3. Provide any custom Title to data source configuration, select source type as RESTful Service and click on Next button.

NOTE: Data Source support below service type and available as part of dropdown:

4. There are multiple things on below page which we need to understand.
Swagger Source: This field is to provide swagger file for data source configuration. This takes swagger file URL or we can select FILE option and upload swagger file from local machine in to AEM server.

schemes and host will pick data from swagger file as shown below and select Authenticate Type as None.

Important Note: USER BASIC AUTHORIZATIN AS AUTHENTICATION TYPE BECAUSE WE ARE USING AEM AND EVERY REQUEST REQUIRE TO AUTHENTICATE. SELECT UTHENTICATION TYPE AS NOW IF OUR SERVICE URL IS PUBLIC AND DONT REQUIRE ANY CREDENTIALS TO ACCESS.
Note: We are covering most used Authentication type as None and API Key. Rest are also similar as we just need to fll required information as part of form.

5. It will show below screen once data source configuration is successfully done:

Create Form Data Model Creation
Let’s create a Form data model using below steps:
- Follow below steps and traverse to Forms option.

2. Traverse to Data integrations option.

3. Click on From data Model as shown below:

4. Provide Title to Form data model, select Data Source Configuration root project folder created as part of above step. Clicking of next button will show earlier created Data Source Configuration.

5. Select Data Source Configuration created as part of earlier steps. Click on create button:

6. It will start showing newly created Data Form Model as shown below:

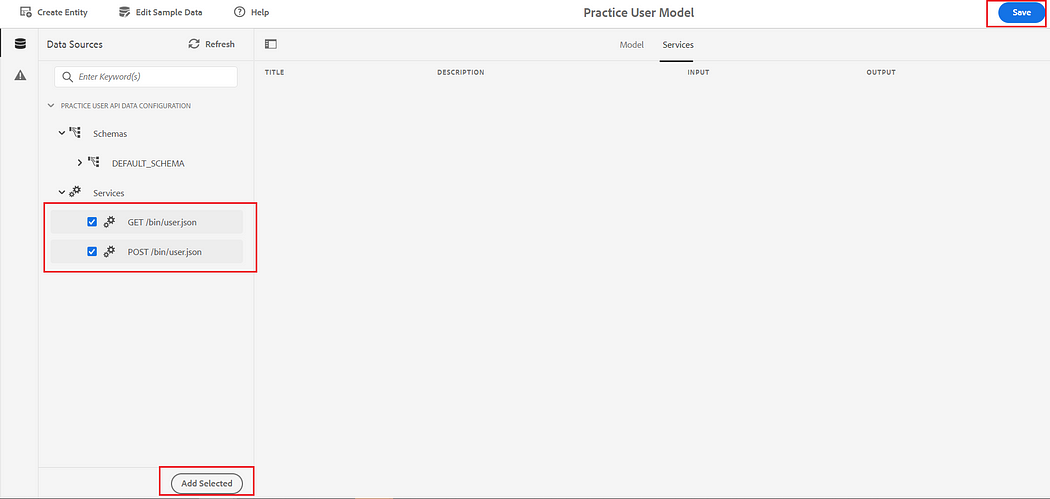
7. Open form data model and click on Sevices tab. Select services, click on Add Selected button and than at last click on Save button as shown below:

Test GET API
9. Select GET /bin/user.json checkbox and click on Test Service button.

10. Click on Test button will given below output. It will it our AEM servlet or API and get the data.

Test POST API
11. Select POST /bin/user.json request and click on test service.

10. Click on Test button will give below output.

Note: Similar to GET and POST we can develop other request methods also.
Create AEM Form
Let’s create a Form using Form Data Model using below steps:
- Follow below steps and traverse to Forms option.

2. For AEM forms creation traverse to Forms & Documents folder.

3. Click on below highlighted options to create an AEM Form:

4. Select below options to create an AEM Form
Template
Select required template to create a form.

Select Data Form Model
Select Data Form Model created on above step under Form Data Model Creation section and click on Create button.

5. Provide Form Title and click on Create button will create an AEM form.

6. Highlighted point number 1 we will be discussion as part of subsequent steps.
Highlighted point number 2 will display content or field hierarchy we are going to drag and drop.
Highlighted point number 3 is to drag and drop form fields.

7. Navigate to below highlighted option and verify schema structure is present or not.

Follow below steps, in case if above data source hierarchy is not present:
a. Open properties as hshown below:

b. Verify if required Form data model is selected under Form model tab as shown below:

8. Clicking on Drag Components here — Root Panel parsys will provide a popup to select panel.

9. Select Drag component here — Section and click on + button to drag and drop components.

10. Select below Text Box option to have a text field.

11. Select text box parsys and click on configure button will open left side navigation menu to fill field specific info.

12. Provide Name, Title which will be a field label, placeholder, check the Required Field checkbox, provide Required Field Error Message.
Let’s discuss more about below highlighted Bind Reference field red in color. This field will help us to make a relation in between created field and earlier uploaded schema.

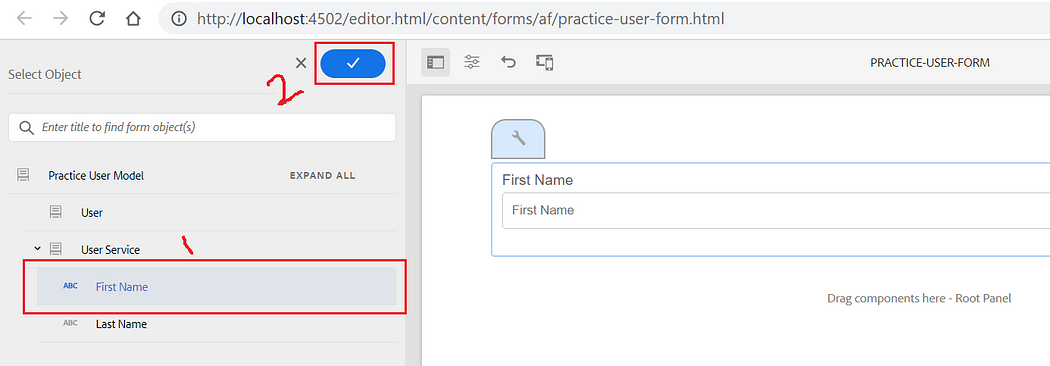
13. Now, let’s map our AEM form firstName field with Form Data Model firstName.

14. After clicking on bind reference option below screen will appear. Select required firstName field and click on ok.

15. Follow same steps 10, 11, 12, 13, and 14 to create Last Name field as shown below:

16. Let’s author a Submit Button for form submission:

17. Now, Select Adaptive form container to update and click on configure button to perform form level authoring.

18. Select Submit using Form Data Model option under Submit Action dropdown field.
Select Data Model to submit as /User which is having GET and POST service created a part of Form Data Model.
Click on ok to save change.

19. Click on top right Preview button to test AEM Form POST request submission:

20. Clicking on Submit button will give below highlighted error in error.log file:
“No default write operation is configured for the data model to submit for form data model”
Note: This issue is occuring because we didn’t create default read, write service as part of Form Data Model.

21. Follow below steps to define default read write service to resolve above error:
Select User Model, click on Edit Properties, fill Title of service, select Read Write Service and click on Done an than Save button as shown in below sceen shot:

22. Repeat 19th step again to test AEM Form submission as shown below:

Wow !!!!
This time form successfully got submitted and called our Servlet POST method as RESTful API and load below thankyou page.

Browser Developer console call to verify success response:

Prefill form on page load with data from /bin/user.json API using Form Data Model
23. Now, again select Adaptive form container to update and click on configure button to perform form level authoring.

24. Select Form Data Model Prefill Service as part of Prefill Service field to fill form values on page load.

25. Click on top right Preview button will call servlet GET method and load below data:

Below Servlet GET method got called as part of preview and prefill form with data:


Imran Khan, Adobe Community Advisor, certified AEM developer and Java Geek, is an experienced AEM developer with over 12 years of expertise in designing and implementing robust web applications. He leverages Adobe Experience Manager, Analytics, and Target to create dynamic digital experiences. Imran possesses extensive expertise in J2EE, Sightly, Struts 2.0, Spring, Hibernate, JPA, React, HTML, jQuery, and JavaScript.
