JPA Form Submission and List User details
This blog will help to understand main Spring boot and JPA Hibernate annotations. There will be a detailed discussion over Spring Boot + JPA + MySQL integration and how to submit form and display same on the page using RESTful web services.
This article will help to learn, revise and prepare for interview on how Spring Boot and JPA actually works step by Step.
JPA stands for Java Persistence API. Spring Boot provides spring-boot-starter-data-jpa as a starter pom dependency to connect with database and perform different operations.
JPA helps us to connect with database and allows us to perform multiple operations such as create, insert, delete data in database. It is an open source, light weight ORM (Object Relational Mapping) tool. It allows us to map Java bean/Pojo objects with database table.
ORM (Object Relational Mapping) tool helps us create a mapping in between Java persistence object and database table.
Spring Data JPA is built on top of the JPA framework which provides code to access database and perform various operations. It reduces the effort to write boilerplate code and helps us to concentrate on business logic. Using this starter we can achieve more in lest time and effort.
Below is the Spring boot data JPA dependency which needs to be declare in pom.xml file.

Prerequisite but not mandatory, It require Java and MySQL setup before start implementation.
Below is the Spring Boot and JPA project code structure which we are going to build as part of this article. We will be making changes inside highlighted package and files.

As part of this article we will be using Spring tool kit and to download and setup Spring Tool Kit please click on this link.
Follow below steps to create our very first Spring application project.
- Open Spring Tool kit we installed here.
- Click on File in top navigation menu and than click on new. There will be an option Spring Starter Project start appearing once we click on create new option.
Below window will start appearing.
Provide below highlighted value for Group and Artifact for the project and click on Next.

3. In the below screen select open Web option and select Spring Web. Click on Finish will create Spring project.

4. Below dependencies are required to work with Form, JPA and MySQL

mysql-connector-java dependency is require to make a MySQL connection pool.
pring-boot-starter-data-jpa dependency is require to perform all database CRUD operation.
spring-boot-starter-thymeleaf dependency is very important as it will help us to integrate html and Java as shown in below screenshot.

5. Create User.java class as mentioned in below screenshot with id and name variable with setter getter.

User class having @Entity and @Table annotations to map the User class with user table in MySQL database.
@Entity annotation will mark class as an Entity.
@Table annotation will map the class with provided table. name attribute can be use to map class name with database table name. It will by default take table name as class name if not provided.
@Id annotation is an Entity identifier
@GeneratedValue use to generate value. This mainly helps to automatically create unique primary key.
6. Create UserRepository.java class which extends JpaRepository interface which contains all CRUD operations.

@Repository annotation provides the mechanism to perform all CRUD operations on objects.
7. Create one more class UserDao.java with below content

@Service annotation helps us to convert any class into service and all other classes can consume it easily with the help of @Autowired annotation .
repository.findAll() is a in-built function from JpaRepository interface which will help us to get data from User table.
repository.findById(id).get() is also a in-built function from JpaRepository interface which will fetch user record for specific id.
repository.save(user) is also a in-built function from JpaRepository and allows us to save or update user object in MySQL database.
8. Create one more UserController.java class with below content

9. Below class by default get created when we create project using STS or initializr.

10. Update application.properties file to provide details to connect with MySQL database.

11. Lets create a database and insert data into MySQL database using below queries
CREATE TABLE user(id int NOT NULL AUTO_INCREMENT, name varchar(255) NOT NULL, PRIMARY KEY (id));
insert into user values(1, “John”);
12. Create form.html file and hit “http://localhost:8080/addUser” will load this form and th:object attribute is having same user as value mapped using below highlighted value.


13. Create user-list.html file to load all users details using ModelAndView.

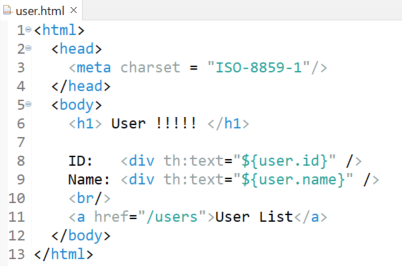
14. Create user.html file to load single user detail using ModelAndView.

15. Select root project folder, right click and select Ran As -> Spring Boot App will start the server.
OUTPUT
Display all Users List
Hitting below URL will display all users on the page.
http://localhost:8080/user

Get Single User Detail by Id
Hitting below URL will return specific user having id passed as 1
http://localhost:8080/user/1

Create User
Hitting below URL will open form to add new user in database.
http://localhost:8080/addUser
On click of submit, it will call post service /user inside UserController.java class.


Imran Khan, Adobe Community Advisor, certified AEM developer and Java Geek, is an experienced AEM developer with over 12 years of expertise in designing and implementing robust web applications. He leverages Adobe Experience Manager, Analytics, and Target to create dynamic digital experiences. Imran possesses extensive expertise in J2EE, Sightly, Struts 2.0, Spring, Hibernate, JPA, React, HTML, jQuery, and JavaScript.
